 My first introduction to Waldorf toys, and really my first serious peek into the world of excellent little "natural" toys was through a Magic Cabin catalog. The mother of one of Audrey's friends suggested I'd like it, and I spent hours on my very slow dial-up connection peering at little beauties that I wanted, but especially wanted to make myself. It took me a long time to figure out how to do this. Materials were initially a problem: grand materials like wool felt are much easier to find now than in 2002. My start was slow, and initially swung through much wee fairy making but I was permanently hooked. Long introduction to say this: WOOL FELT BUNNIES!
I spent hours searching for a pattern for little felt bunnies like some I had seen in Magic Cabin, but never found one, and so drafted my first little animal pattern in 2006: crouching bunny! I wanted to share it for Easter making, but, ahem....well, now shared for last-minute Easter making, or perhaps just spring-making. Or next-year Easter making....
In an effort to cut down on my scrap paper using-and-losing, I trace my favorite original patterns in the pages and back cover of this excellent book, which I recommend. It boasts many other grand wee felt ideas: You may reproduce this in several sizes if you would like, though I warn that much larger or smaller, this pattern doesn't translate quite as well (my 1" and 8" versions, for instance, were awkward: okay but made me wrinkle my nose). My actual pattern measures 2 1/4" across the side bunny piece. Wish I had mad computer skills, or the software, to make you a clever and neat .pdf, but you'll have to manage by either printing one of these versions or tracing it directly from your computer screen:
 Materials:
stuffing, You may reproduce this in several sizes if you would like, though I warn that much larger or smaller, this pattern doesn't translate quite as well (my 1" and 8" versions, for instance, were awkward: okay but made me wrinkle my nose). My actual pattern measures 2 1/4" across the side bunny piece. Wish I had mad computer skills, or the software, to make you a clever and neat .pdf, but you'll have to manage by either printing one of these versions or tracing it directly from your computer screen:
 Materials:
thread (matching + floss for nose), needle, tail fluff, wool,  felted sweaters (my mom's choice) and wool blazer (my choice);
 felted sweaters (my mom's choice) and wool blazer (my choice);
  wool bits left in my washer after felting thrift-store sweaters
and mini brads for eyes.
 Using these little scrapbooking brads for eyes was the brainchild
of my friend Stephanie. They're an excellent mini alternative to safety eyes.
I have drawn pupils on other colors, but really like black the best.
When all you can find is a mixed batch (or they are much
cheaper that way), Sharpies work their usual magic.
Pin and cut the bunny pieces (two of the side piece).
 Then cut ears in a contrasting color. I cut mine smaller than my mom's; you may choose to line either the whole ear or just a part. I may have made her make hers different, so you can see the difference ;).
 Then cut ears in a contrasting color. I cut mine smaller than my mom's; you may choose to line either the whole ear or just a part. I may have made her make hers different, so you can see the difference ;).
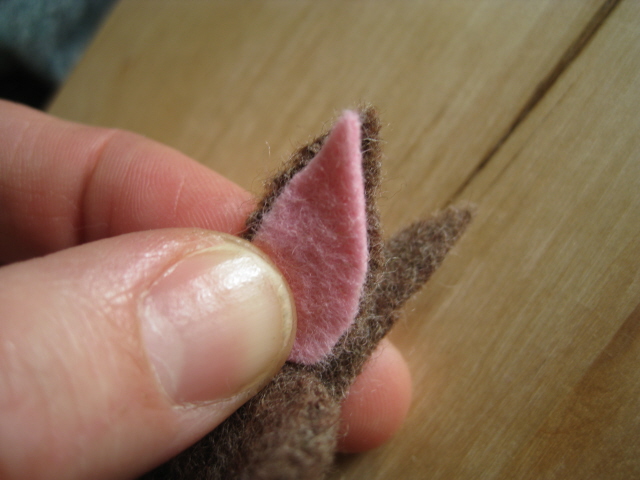
 If you have sewn wee animals before, it might be obvious how to assemble the bunny pieces. If you haven't actually used the word "gusset" before, then you might want a little extra detail, so here goes! I use a whipstitch to sew felt, making flat seams by sewing on top. A really great tutorial on handsewing felt can be found here:
http://www.futuregirl.com/craft_blog/2007/01/tutorial-hand-sew-felt.aspx
The skinny hourglass shape is the gusset: it gives the head and body roundness while preserving a slim neck. You want the tip of the gusset to line up with the tip of your bunny's little nose, like thus:
 Felt can (will) stretch a bit out of shape as you sew it, so I've found that a good way to help my gusset line up nicely is to start at the neck (the skinny bit), here:
 Holding the pieces flat against each other, stitch from the neck up to the ear. My pattern (oh so cleverly, eh?!) adds three-dimensional ears in one "bunny side" piece. Clip the ear from the tail end, one-half of the way along the base (peek back at the pattern photo to see exactly where). As you stitch along the head, when you get to the ear, fold it in half lengthwise and stitch it in place to make a neat little ear. The view from the back:
 and from the front:
 Continue stitching from the ear to the tip of your bunny's nose.
 Then turn, and stitch from nose-to-tail on the other side, pausing to clip-and-stitch the other ear in place as well:
 pinch the ear
 Halfway there!!
 a mid-task noodle-break, captured by Marian :)
 When you reach the tail-end of one side, carefully line up the two sides exactly opposite each other, and begin to stitch the remaining tail-to-neck section. One edge may seem to be longer than the other, but if you hold and ease it into place, everything works out.
 This is a good time to add the eyes, while the reverse of the fabric is still accessible. I think the mini brads are a slick eye solution, but you may also use a French knot or just a small stitch with black floss.
The final piece to be added is the base. Again, I start stitching at one of the corners to facilitate lining everything up neatly.
 Pause stitching when you have about an inch left and stuff firmly. When I stuff, I finger-massage the upper seams to help them lay flat and round out the bunny's curves.
 Finish stitching. The tip of the base curves up in back when everything is attached:
 Now attach the tail fluff. I've sewn on a bit of cotton ball to be "authentic" (you know: "Here comes Peter Cottontail, hopping down the bunny trail..."), but this time chose wool. Fold a bit of fluff so all of the ends are tucked under neatly, and stitch it on. Little stitches along the ends hide in all of the volume, or you can needle-felt it in.
 I like to add the little ear linings last, though you may do them earlier. I used to glue them, but have started stitching those in as well.
(Or, like below, just propping them in because the light is fading and you need to take photos while it lasts but really need to go onto your motherly responsibilities instead of sewing and chatting for another hour, which is not time wasted, especially with your visiting-from-Idaho mom who taught you to sew & love it in the first place, but yes, those kids do need to eat and that's not just them being selfish.)
Basket-ready bunny!

If you make a bunny, do send me a pic. I'd love to do a bunny-gallery post!
This pattern is also adaptable to other critters. Peek here at the beaver and squirrel my friend Sally made: http://daisy-chaincreations.blogspot.com/2010/01/other-two.html


10 comments:
this is cutest bunny I have seen! I usually make things like this to give away but I think it's definitely a keeper. Sweet!
Love the bunny!! I want a copy of the pattern, but I am being snobish, and want to copy it from your book, if you'll allow. :)
What a sweet sweet bunny!
This is so sweet!
These are so cute. Fortunately, I already have some!!! I get really excited every year to get them out of the Easter box!
Gosh, I love this! I'll be making some of these this spring for sure. ;) Thank you so much for the how to!
I need to try this! Thanks for the tutorial. The bunny was very cute :)
I posted you tutorial on Craft Gossip Felting; stop by and leave a comment :) http://felting.craftgossip.com/2012/03/22/felt-bunny-tutorial-pattern/
Linda
So cute! Thank you for sharing the pattern I'm going to make a couple for my mom's Easter basket.
This was llovely to read
Post a Comment